Translations to and from Word and other word processing programs like Google Docs and Mac Pages are not always seamless. Several different kinds of problems can crop up.
Today I’m going to tackle the perplexing phenomenon of mega-weird apostrophes (MWAs).
(Want to skip right to the fix? Click here.)
What Are MWAs?
MWAs are not always apparent at first glance, especially if you’re using Times New Roman or Arial as your document font, because they masquerade as one of those two fonts. But you will notice some odd behavior when working in Word with a document that has MWAs:
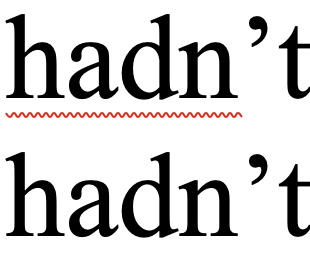
A Case of the Squigglies: If the document is set to show spelling errors, you’ll get red squigglies in a lot of the contractions that are perfectly normal contractions and shouldn’t be flagged for spelling. In the image shown, the top hadn’t was copied from a problematic document and has an MWA — you can see the squigglies under hadn. The bottom one I typed from scratch, and you’ll see that there are no red squigglies, which is how it should be.
Jumping Arrows: When you’re arrowing through the letters or trying to select part of the word, the cursor doesn’t behave properly around MWAs — in the word hadn’t, when you have the cursor between the d and the n and then arrow over one space to the right, the cursor jumps to after the apostrophe. One more arrow over seems to not do anything.
Jumping Text When Selecting: If you’re dragging to select text, the selection will seem to “jump” as you’re moving around MWAs.
What Doesn’t Work
The first reaction is usually to select all and change the font, but that doesn’t fix the problem. If you select the whole word and change the font to something other than Times New Roman or Arial, the apostrophe will not change font.

In the image above, the top line with the MWA clearly shows a Times New Roman apostrophe in the middle of the rest of the text in Abadi MT. The bottom line shows what the apostrophe should look like in Abadi MT.
(There’s a bigger weirdness here in that if you change Times New Roman to Arial or vice versa, the apostrophe will change font, but it’s still an MWA.)
The second reaction is to do a find and replace (F&R) for just the apostrophes, but that doesn’t fix it, either.
I haven’t been able to track down exactly what causes this problem or why changing the font or running a simple find & replace doesn’t fix it — but I DO have a solution!
(Actually, I have two solutions, but this is the easiest and least prone to screw-ups. I‘ll write up the other one another time.)
Here’s One Way to Fix Mega-Weird Apostrophes with Wildcard Find & Replace*
This looks long and complicated, but it’s not, really. I just wanted to write out the step-by-step instructions for people who might not be familiar with or entirely comfortable with wildcard F&R. We’re simply telling the computer “Find an apostrophe and the characters on either side of it, then replace it with the same thing.”
For some reason I don’t understand, picking up the characters on either side of the MWAs “smooths over” the fact that they’re weird and lets us “zero out” whatever attribute it is that’s causing the problem.
(I‘m a Mac person, so my screenshots are all Mac-based, but you can do the same thing on PC; it just might look slightly different.)
Step 1: Make a Copy
The first step in solving tricky document gremlins is always to make a copy of the document and store the original in a safe place, in case something goes kablooey.
Step 2: Turn Off Track Changes
IMPORTANT: If Track Changes is on, turn it off. We’re going to work with wildcard find & replace, which gets mucked up if Track Changes is on.
Step 3: Take a Deep Breath
Wildcard F&R sounds scary, but once you get past that fear, it’s incredibly powerful. And you made a backup copy in step 1, so if you mess something up, no harm, no foul.
Step 4: Open the Advanced Find & Replace dialog box
On a Mac, there are three different ways you can get there:
- Go under the Edit menu to Find, then select Advanced Find & Replace from the bottom of the pop-out menu.
- If you use Find in the Sidebar (on the left), click the little gear next to the Find button and select Advanced Find & Replace.
- Use the keyboard shortcut: ⌘-shift-H.
On a PC, you have some options, too:
- On the Home tab, select Replace.
- Use the keyboard shortcut: control-H.
Step 5: Reveal All of Your Options
Show the advanced functions, if they’re not already showing:
- Mac: click the little down arrow in the lower left of the dialog box.
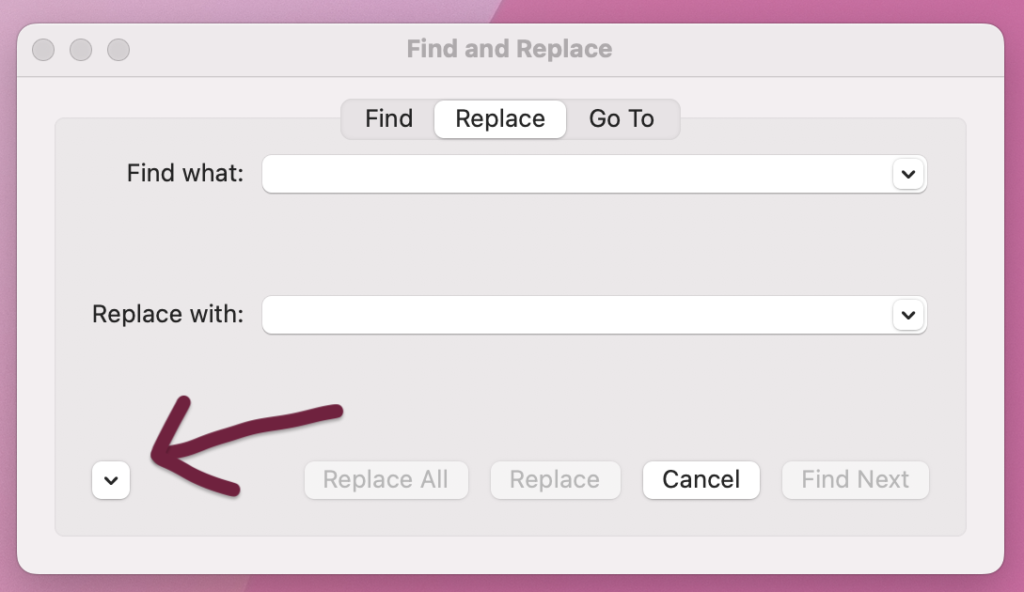
- PC: click the More button.
Step 6: Turn on Wildcards
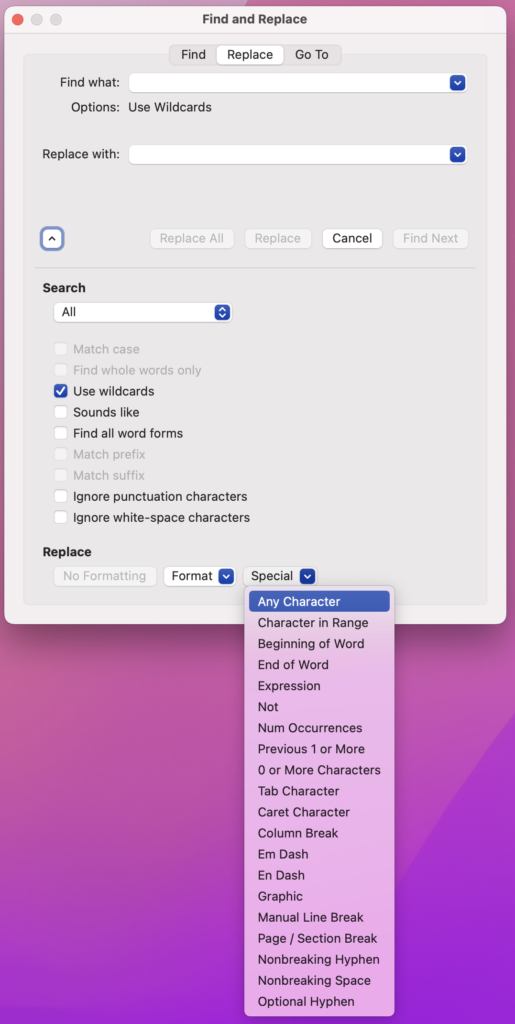
In the list of options, click Use wildcards.
Step 7: Tell Word What to Find
Place your cursor in the Find what box and type:
(?)’(?)
Alternatively, you can copy and paste it from here. This will find any character followed by an apostrophe followed by any character.
NOTE 1: ? is the wildcard search for any character. You can get the same thing if you go to the Special dropdown in the Advanced F&R dialog and choose Any character. Lucky for us, “any character” also includes paragraph returns, so we don’t have to do any additional massaging of the text before we do the find.
NOTE 2: You need to enclose the Any character search (question mark) in parentheses. Parentheses define wildcard groups that you can then do something with in the replace box.
NOTE 3: You need to type a proper curly apostrophe, not the straight one that usually shows up in F&R when you just hit the key on the keyboard straight up. This is one of those things that’s different when you’re using wildcard F&R (as opposed to regular F&R). To get a proper curly apostrophe:
- Mac: option-shift-]
- PC: hold down alt and type 0146 on the number pad
Step 8: Tell Word What to Replace That With
Place your cursor in the Replace with box and type the following, being sure to use the curly apostrophe like you did in the find:
\1’\2
The \1 refers to the first thing in parentheses, and the \2 refers to the second thing in parentheses.
NOTE: Those are backslashes, not forward slashes.
Step 9: TEST!
Before you get ahead of yourself and hit Replace All, TEST IT by doing one or two replaces to make sure you get the results you expect. Then and only then, hit Replace All.
Step 10: Celebrate!
Do a little dance in your desk chair, turn Track Changes back on, and proceed with your work.
There’s a Macro for That!
If you come up against this problem often, it might help to make this wildcard F&R into a macro. I’ve saved you the trouble. Here you go*:
Sub MWAfix()

'

' MWAfix Macro

' fixes mega-weird apostrophes

' Lori Paximadis, Systems & Shortcuts - September 18, 2022

'

    With Selection.Find

        .Text = "(?)’(?)"

        .Replacement.Text = "\1’\2"

        .Forward = True

        .Wrap = wdFindContinue

        .MatchWildcards = True

    End With

    Selection.Find.Execute Replace:=wdReplaceAll

End Sub
Disclaimers
* The usual disclaimers apply: This procedure and macro have worked for me on my computer in my version of Word 365 as of today. It is your responsibility to test it thoroughly on your own computer in your version of Word to make sure it works as expected for you, and it is your responsibility to tweak it as necessary to make it work with your particular setup. Neither I personally nor my company (Pax Studio LLC) accepts any responsibility for the suitability or use of the procedure or macro now or in the future, or any problems it may cause with files you use it on. As always, TEST any procedure, macro, etc. you use on a copy of your work rather than on live files. Microsoft rewrites code all the time, and sometimes that breaks things or changes how they function. YMMV.